![]() by Mark E. Lasbury for Indiana On Tap
by Mark E. Lasbury for Indiana On Tap
Whether it comes from a bottle, a can, or a tap, you somehow have to get your beer from container to glass. I understand that there are those situations where drinking from a can or bottle is fine, but they should be limited to hot days mowing the lawn, shower beers, and the bottles that wash up on the beach of the island upon which you are stranded. And NEVER, EVER drink directly from the tap.
Actually there is one example I know where that might be OK. My nephew the engineer ran new lines through his basement and connected his home brew kegs to his backyard spigot. Drinking from the tap in that case is almost mandatory. In all other cases, pouring a beer is de rigor, and it turns out that there are right and wrong ways to pour a beer.
If you are pouring your own beer, you can pour it anyway you like – lots of foam, no foam, slow, fast, or as if it were a tap beer. People enjoy pilseners (I’m feeling European and standoffish today) in different ways, from no head (called cochtan) to only foam (called Mliko, it supposedly gives a malt flavor and cuts the hop bitterness). Can you believe there are names for different foam pours? Higher alcohol beers pour less foam since ethanol inhibits bubble formation, so if you want a good head on your Bier Barleywine, you’re going to have to pour a bit more vigorously – I wonder if there is a name for that. In any case, pouring a “perfect” beer from tap, bottle, or can is a similar procedure for pouring from a tap, so let’s talk mostly about pouring beer from the tap.
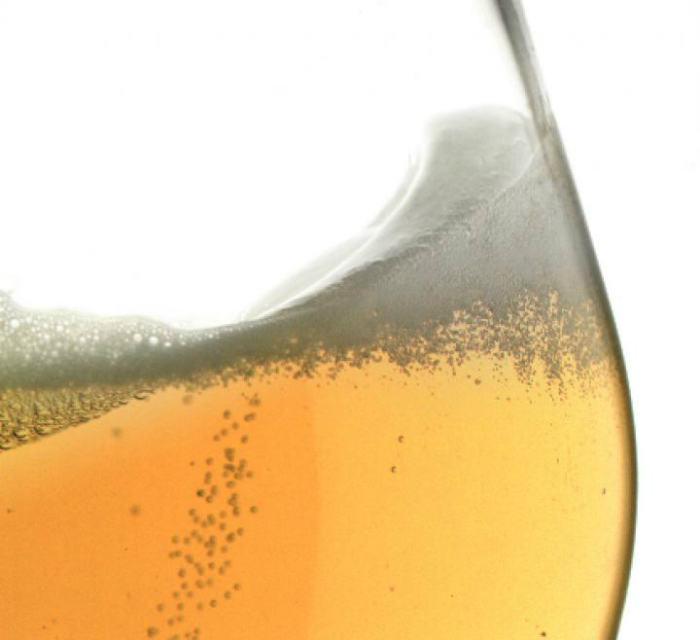
What is Beer Foam and Why it Matters. In most respects, the key to pouring a proper beer is the foam on top; the majority of attention in pouring beer involves limiting or enhancing the head, sometimes called the collar or kräusen. The foam of your beer is really a complex chemical system (called a colloid, not unlike fog, except here it is a gas suspended in a liquid instead of a liquid suspended in a gas). Going back to the desert island reference, that foam that settles on edge of the riverbank or shore where it is rocky is very similar to forming a head on beer when it is poured. In both cases, the foam is basically gas bubbles stuck together with protein and other biochemicals (especially isohumolones, some of the bitter tasting iso-alpha acids). The proteins in the beer is mostly lipid transfer protein 1 (LTP1) from barley – but let’s not get too scientific – cling together and trap the escaping gas. As the bubbles pop, many of those chemicals are flung toward your nostrils for your olfactory enjoyment.
Why, you ask is the head so important? As alluded to above, the head of the beer is how the aroma reaches you. Just as you eat with your eyes first, you encounter beer with your nose before it passes your lips. Popping bubbles of CO2 carry the hop oils, fruit oils and other volatile chemicals to your nose and palate, beginning the process of tasting and understanding the beer. Hence all the fuss about your glass as the tool that should best collect and focus those aromas for your approval.
Secondly, beers just look better with a proper head. And like make-up on a first date, more is not always better – too much foam on a beer or make-up on your date looks odd and suggests that something is amiss. Certain things can be learned about a beer based on its head if you want to take the time. Smaller bubbles indicate more stable foams and lower surface tension, while the whiteness of the head is actually more appealing (see this 1985 paper). The time a head is retained and the lacing it forms on the side of the glass as you drink say something about the malts involved – although it might tell more about the cleanliness of the glass used. The LTP1 mentioned above attracts other proteins to it and makes it denser over time; this is why lacing is more apparent if you drink your beer from a clean glass slowly, the more dense protein aggregates stick to the glass better.
The more you get into it, the more foam and head retention might mean to you. Walter is the queen of the six-hour beer, so head retention definitely means something to her. In chemistry terms, the longer the head remains, the less O2 from the air interacts with the beer. In most cases, oxidizing of a beer occurs over days, if not weeks, but if you are OCD and drink beers very slowly, when maybe you want the foam to stick around to isolate your beer from oxygen. That really isn’t a problem for me – no beer lasts that long around me.
Lastly, foam can affect the taste perception of the beer. Just like mint “feels” cold and capsaicin “feels” hot in your mouth, foam bubbles popping can impart a physical perception of the taste of the beer. Without a head, the beer will taste different. The foaminess will soften the taste on the palate, making more bitter beers taste slightly less bitter. The foam softens the feel of the beer on the palate.
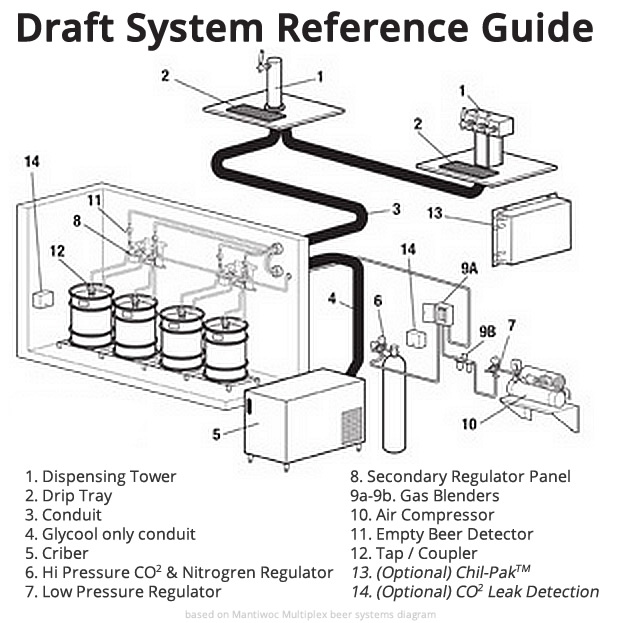
How to Pour a Beer. When the beer reaches the tap faucet (which is attached to the tap handle) it is ready to burst forth. And it is here that we reach the point at which a beer server (or the patron, see next week’s post) needs to have some skill and practice.
The first rule of pouring beer – never allow the beer in the glass to touch the tap – this promotes bacterial growth on the outside of the tap. The running of the beer ensures that the inside of the tap is almost always pristine, but the outside can become contaminated. Walter is a clinical microbiologist for a very large medical group, so this matters to her. There are dozens of beer pouring tutorials on the web, and this is the one thing they have in common – don’t let the tap faucet touch the glass or the beer.
The second rule is a bit more nebulous. For most people, never open the tap faucet less than all the way, this makes it foam way too much; it’s an all or none endeavor. The gas ratio will be way off and will foam too much. However, Jeremy at at the now defunct Heady Hollow Brewing did this on purpose, it’s how he insured that each beer had a decent head on the top, not matter how the individual beer style lends itself to head formation – quite ingenious if you ask me.
You may be one of the people that hold to the rule of only opening the faucet 100%, but this doesn’t mean that you can’t control the beer at the tap. Some tap faucets, called variable flow control taps (VFTs), have small levers on the side to control the rate of flow from within the faucet without creating too much turbulence. This isn’t too much different from a variable flow control in your shower or tub.
These tap faucets are especially good at controlling the foaming of beer over non-pint pours, like growlers and samples. The large volume and increased distance to the bottom of the growler increase the turbulence and therefore the head, and this is a significant source of waste for breweries. Likewise, the very small volume of tasters tends to bring foam too little or too much, so they can also be controlled using VFTs.
If you enjoy nitrogen foam heads and cascading for your beer, thank Michael Ash and his team at Guinness. They first developed the strategy in 1954, using 75% nitrogen and 25% carbon dioxide (also called beergas or Guinness gas if it comes in a single tank). Nitrogen tap faucets are longer than regular taps because they include a restrictor disc that breaks the nitrogen out of solution. The disc, and the longer tap itself, creates the cascading head of a nitrogen beer they you just can’t stop staring at.
The nitrogen forms smaller bubbles with lower tension, so they do two things well, float to the top, and stick together. Because they form an aggregated mass of bubbles with lots of surface area for bonding, they end up being less likely to pop and the head lasts longer. The higher surface area also captures more protein, so the head tastes creamier as well. A creamy texture and a lasting head for aroma and mellowed bitterness – sounds good to me. But like everything else, a good invention can be abused. Some people are starting to use nitrogen do pour IPAs, but Walter believes this to be an abomination. Just as she’s sure God drives a silver Thunderbird, she knows he doesn’t drink IPAs on nitrogen.
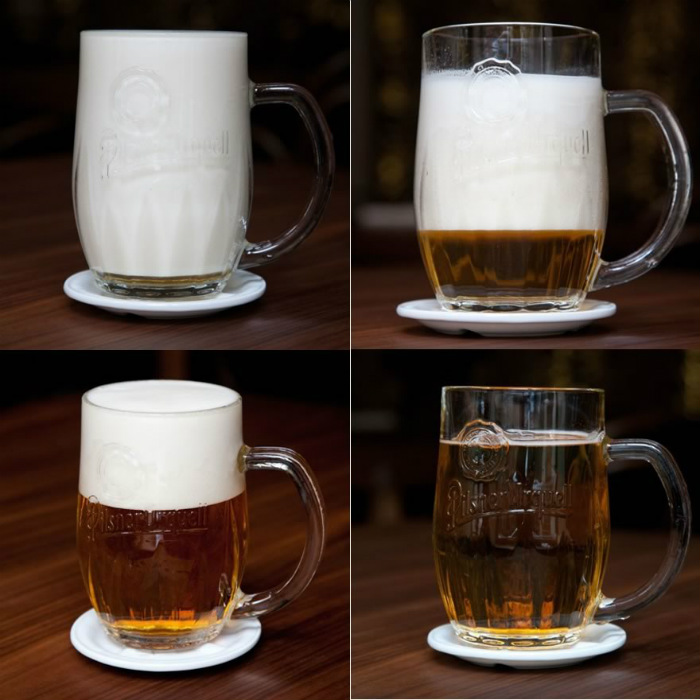
With all this knowledge, I guess we should now impart the third rule for pouring the perfect beer – actually pouring the beer. Most of online tutorials and real life pourers keep to a fairly similar pattern for pouring most beers. First you hold the glass at a 45˚ angle to the tap faucet, then you open that tap completely and pour down the side of the glass. When the glass is ½ to ⅔ full, turn the glass so it is vertical and pour straight down the center of the glass. This creates more turbulence and gives you the nice head. People differ on just high big a collar to shoot for, but anywhere from 1 finger to two fingers (1 -1½ inches) is adequate. Overall, this process will serve you about 90% of the time.
Alternative Pouring Techniques. However, not every beer is poured best using the above technique, even if it will suffice for most beers. Wheat beers have a tendency to foam a bit more if the system is set up normally, so the first part of the pour is usually gentler. Hold the glass almost horizontally and put the tap lower into the glass, but the ⅔ rule and then down the middle still applies for creating the proper head.
Some people choose a two-part pour for wheats and for stouts on nitrogen; pour the first part, let the beer rest, and then finish the pour. This is important for the drinker to realize, your beer might take a bit longer to get to you if poured this way – be patient. Consider the Germans and their theory of the seven-minute pilsener pour. Pour, rest, pour, rest, etc. is the only way to get the proper head for a German pilsener according to many in the old country. There’s no way that would fly in a US brewery or bar; life just moves too fast here.
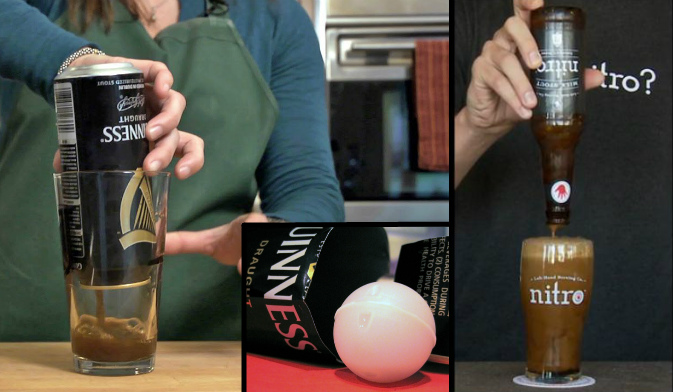
For cans and bottles, the usual pour might work in many cases, but turning the bottle or can upside down and doing a single pour works for Left Hand Nitro bottles or Guinness cans. If the Guinness can has the widget, in that case the normal 45 degree pour will still allow for the cascade. For Left Hand, the upside down pour is necessary – it doesn’t have a widget with CO2 in it to agitate the nitrogen bubbles out of solution when opened. You have to agitate it yourself, and that is best done with the glug, glug of an upside down pour.
As with everything in life, different people do advocate different pour techniques. Cicerone Mike Reiss uses a head-first pour because he thinks the head lasts longer that way. This is similar to two different pilsener pours, the Hladinka – head-first then fill, as opposed to the fill first and head last pour, the Na Dvakrat. First Mike pours very slowly to prevent the “glug glug” which causes too much turbulence and over foaming. Then he pours down the center first from height to produce a head (turbulence is what drives the CO2 out of solution), and then tilts the glass to 45˚ when the head is done. He is also a proponent of the two-step pour with a rest in the middle for all types of beers.
Taken together, the conclusions we can draw from this discussion are two; 1) the head of a beer is important for several reasons and you should learn to appreciate the foam, and 2) there are different ways to pour a beer, but no matter which way you choose – practice and repetition are the keys. Help your beer slinger become better – order more beer.
